Tuesday, January 17, 2012

2012 - Project #3 - Art Project Books

If your kiddos are anything like mine they bring home tons of (seriously brilliant) art projects from school, church, library, etc. What do you do with them all? I know some moms have a great filing system for all of these creations. But I just couldn't come up with a good one. So I started taking pictures of each and every (again seriously brilliant) scrap of paper and then (gulp) throwing them away. I know I will probably regret this some day when my kid is a famous artist and all those scraps would be worth major moolah.

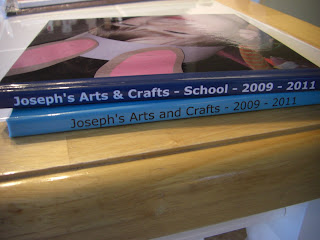
But now what to do with all these pictures on my computer? I came across another great idea. Put them all into a nice, neat little photo book! Brilliant. And that's what I did. Our first two books arrived today and Big J is rediscovering his masterpieces all over again (without getting glitter everywhere!)
2012 - Project #2 - Christmas Cards


I discovered this idea on Pinterest several months ago and did it with last year's cards. So, I was excited to complete the project again with our 2011 cards. I love having them handy to browse through instead of taking up place in a box or drawer because I haven't the heart to toss them.

And it's crazy easy! Just hole-punch all of your cards and bind them together with metal rings. Done!

Saturday, January 14, 2012

Custom Toms


It happened. My precious, comfortable Toms developed a hole! (gasp) I had saved up my pennies for my first pair and wore them everywhere. I spilled red fruit punch on them and had to wash them. They were faded but I still wore them. Then the hole. I just can't wear shoes with holes folks.

I know eventually I'll have to spring for a new pair of Toms. But in the meantime, I felt much better about shelling out the $2 it cost me to turn these -

into these!

How I did it:

I visited my friendly neighborhood Hobby Lobby and found this fun fabric and the Peel N Stick fabric glue. I especially loved this product because I didn't have to wait for it to dry. (Although I did use regular fabric glue at one point as you'll see.) I bought a 1/2 yard of fabric and used about a 1/4 yard.
First I cut two squares of fabric that were big enough to cover the fronts of my shoes. I cut the squares diagonally, sewed them back together and then top-stitched the seam to mimic the Toms seam.

I matched up my seam with the seam on my shoes and pinned it in place.

Then I was able to fold down the top


and pin it in place. I carefully cut a slit in the middle and folded those edges under as well.
I made two stitch lines on the top edge of the fabric. The first was right along the edge and the second was a little over a 1/4 inch inside. I also made a stitch line horizontally across the V.
And of course I missed photographing one step. At this point I began to stick the fabric tape along the top edge of the shoe. Once the tape was in place I pressed the sewed edge of the fabric down, matching up the edges. I placed another piece of table along the center seam line.
After you peel off the backing, the transparent tape remains. I didn't take the tape quite down to the sole of the shoe so there would be room to attach the bottom edge.
One the top edge and center seam were adhered, I began to glue down the bottom edges. First I trimmed the excess fabric so I had about 1/4-1/2" of fabric to tuck under. Then I attached a piece of the tape on either side of the shoe (leaving space to make the pleats at the toe.)
I started on one side and began tucking the fabric under and pressing it to the tape.
Once both sides were done, I folded back the fabric at the toe and attached the final piece of tape. Then I folded it down and secured it.
At the pleats I used my regular fabric glue and put a small dot on each pleat to hold them in place.
And done! My Toms have a fresh, fun new look!!!

Friday, January 6, 2012

2012 - Project #1 - Homemade Laundry Detergent

Do you have a running list of projects to which you keep adding but rarely cross off? No? Just me? Okay then. Well I've decided that this is the year of crossing them off and sharing them with you in the process.

I've been wanting to try this recipe for homemade laundry detergent but was scared that, after making the 10 gallons, we would hate it. Then a friend made some and shared a sample. (A very nice friend thing to do.) And now - we have our own 5 gallon bucket in the laundry room filled with homemade laundry detergent. The awesome thing? I spent a total of $12 (including the bucket and lid) and have ingredients left over for future batches. And it only took about 10 minutes to make.